If you haven't heard about it during your android development, you should check it out. Of course if you employ some kind of e2e testing on your app, please don't tell me it's just manual or none at all.
If you don't want to read all my useful but digressional intro, just skip to how it's done and learn how to connect appium inspector to android device.
When you or your client designed your app, he probably said that "when I open then app and click on that, I want this to show". That is also known as a Gherkin syntax and it's popular syntax for behavioral driven testing, everyone understands it and it's also a documentation.
And what your client said, and I suppose he said quite a lot , should be standardized as a list of criteria known as acceptance criteria.
This is the bare minimum that your app should pass to make it production ready right?
Now in this scenario I am my own client because I made an app I needed and to get better acquanted with the whole react native ecosystem. Btw I've found that best way to learn something is through doing, yes I read quite number of books (check out O'Reilly) but there's nothing compared to actual practical work.
I like to strive to test driven development, but in reality I rather do the whole TDD process during refactoring (which is opposite).
E2E testing React Native
When developing your React Native app there's a lot to cover, but lets focus on e2e testing.
E2e testing is that kind of testing of functionality as a whole where some parts might be mocked if there's no way around it (e.g. billing of resources like Datadog, Google signin e2e testing is hard).
You have 2 options in e2e testing for React Native: Detox and Appium.
I Gave up on trying to make Detox work
I've tried to get Detox to work, I've really tried but it's just to iffy to setup with Expo. It timeouts on the new expo sdk 50. I also don't like it - tedious to setup and you need to build a special release just for detox. It just has a certain smell to it... I'd like my e2e to be black boxed - which means the one who performs the tests doesn't need to know what's inside.
And how Detox works is that it needs to modify your app so you can test it. Is it then grey box?!
Disclaimer, I haven't spent that much time on it, prove me wrong.
Appium reminds me of Selenium
On the other hand, Appium doesn't need to know what's your app made from. It's a pure black box testing and what's even better, it follows the Selenium architecture philosophy. Over the years I got very much familiar with Selenium. It was my first job after all, mastering the scraping...
Appium feels like a much more mature but it also gets iffy in the beginning.
Cool thing about Appium is that you can connect it to cloud driver stacks like Amazon Device Farm.
Why Appium Inspector
Using Appium Inspector before writing end-to-end (e2e) tests for mobile applications is highly beneficial for several reasons. Appium Inspector is a graphical interface that allows you to interact with your application and examine the elements within it, which can significantly improve the process of writing automated tests.
- Visual Interaction: Appium Inspector provides a visual representation of your application, allowing you to interact with it in real-time. This makes it easier to identify UI elements that you need to interact with in your tests.
- Locating Elements: It allows you to locate and identify UI elements based on their attributes such as ID, class name, XPath, accessibility ID, etc. Accurately locating elements is crucial for interacting with them during tests (e.g., clicking a button, entering text, etc.).
- Testing Element Locators: You can test the effectiveness of different locator strategies to ensure they select the elements you intend before using them in your test scripts.
Connect appium inspector to android
Instruction is very similar for a real device and for emulator except emulator is more permissive.
Prerequisite
- Enable USB debugging - Your device has to have USB debugging enabled because appium will install a few packages on it.
- Same WIFI - Your device is connected to the same network as the device where appium is running from.
- Android SDK is configured - ANDROID_HOME, adb paths. Check out my instructions for configuring Android SDK.
Initial Setup and Configuration
Environment Preparation: Ensure that your development environment is ready. This includes having Node.js installed, and your Android SDK set up correctly. This can be verified using appium-doctor, which checks if your environment meets the requirements for running Appium.
- Install appium
npm install -g appium@beta @appium/doctor- Run Appium Doctor to Verify Setup:
appium-doctor --androidRunning the appium doctor, although it's a deprecated package is still useful cause it checks if you configured your PATHS correctly, like ANDROID_HOME.

- Install uiautomator2 (Appium’s driver for Android):
appium driver install uiautomator2@latestDuring appium server start, you might get a warning that Driver "uiautomator2" (package appium-uiautomator2-driver) may be incompatible with the current version of Appium (v2.0.1) due to its peer dependency on older Appium v^2.4.1. Please upgrade appium-uiautomator2-driver.
You can always check for driver updates with appium driver update uiautomator2.
Download inspector and Connect the device
Download the appium inspector and run it. In my case it was:
chmod a+x Appium-Inspector-linux-<version>.AppImage
./Appium-Inspector-linux-<version>.AppImage
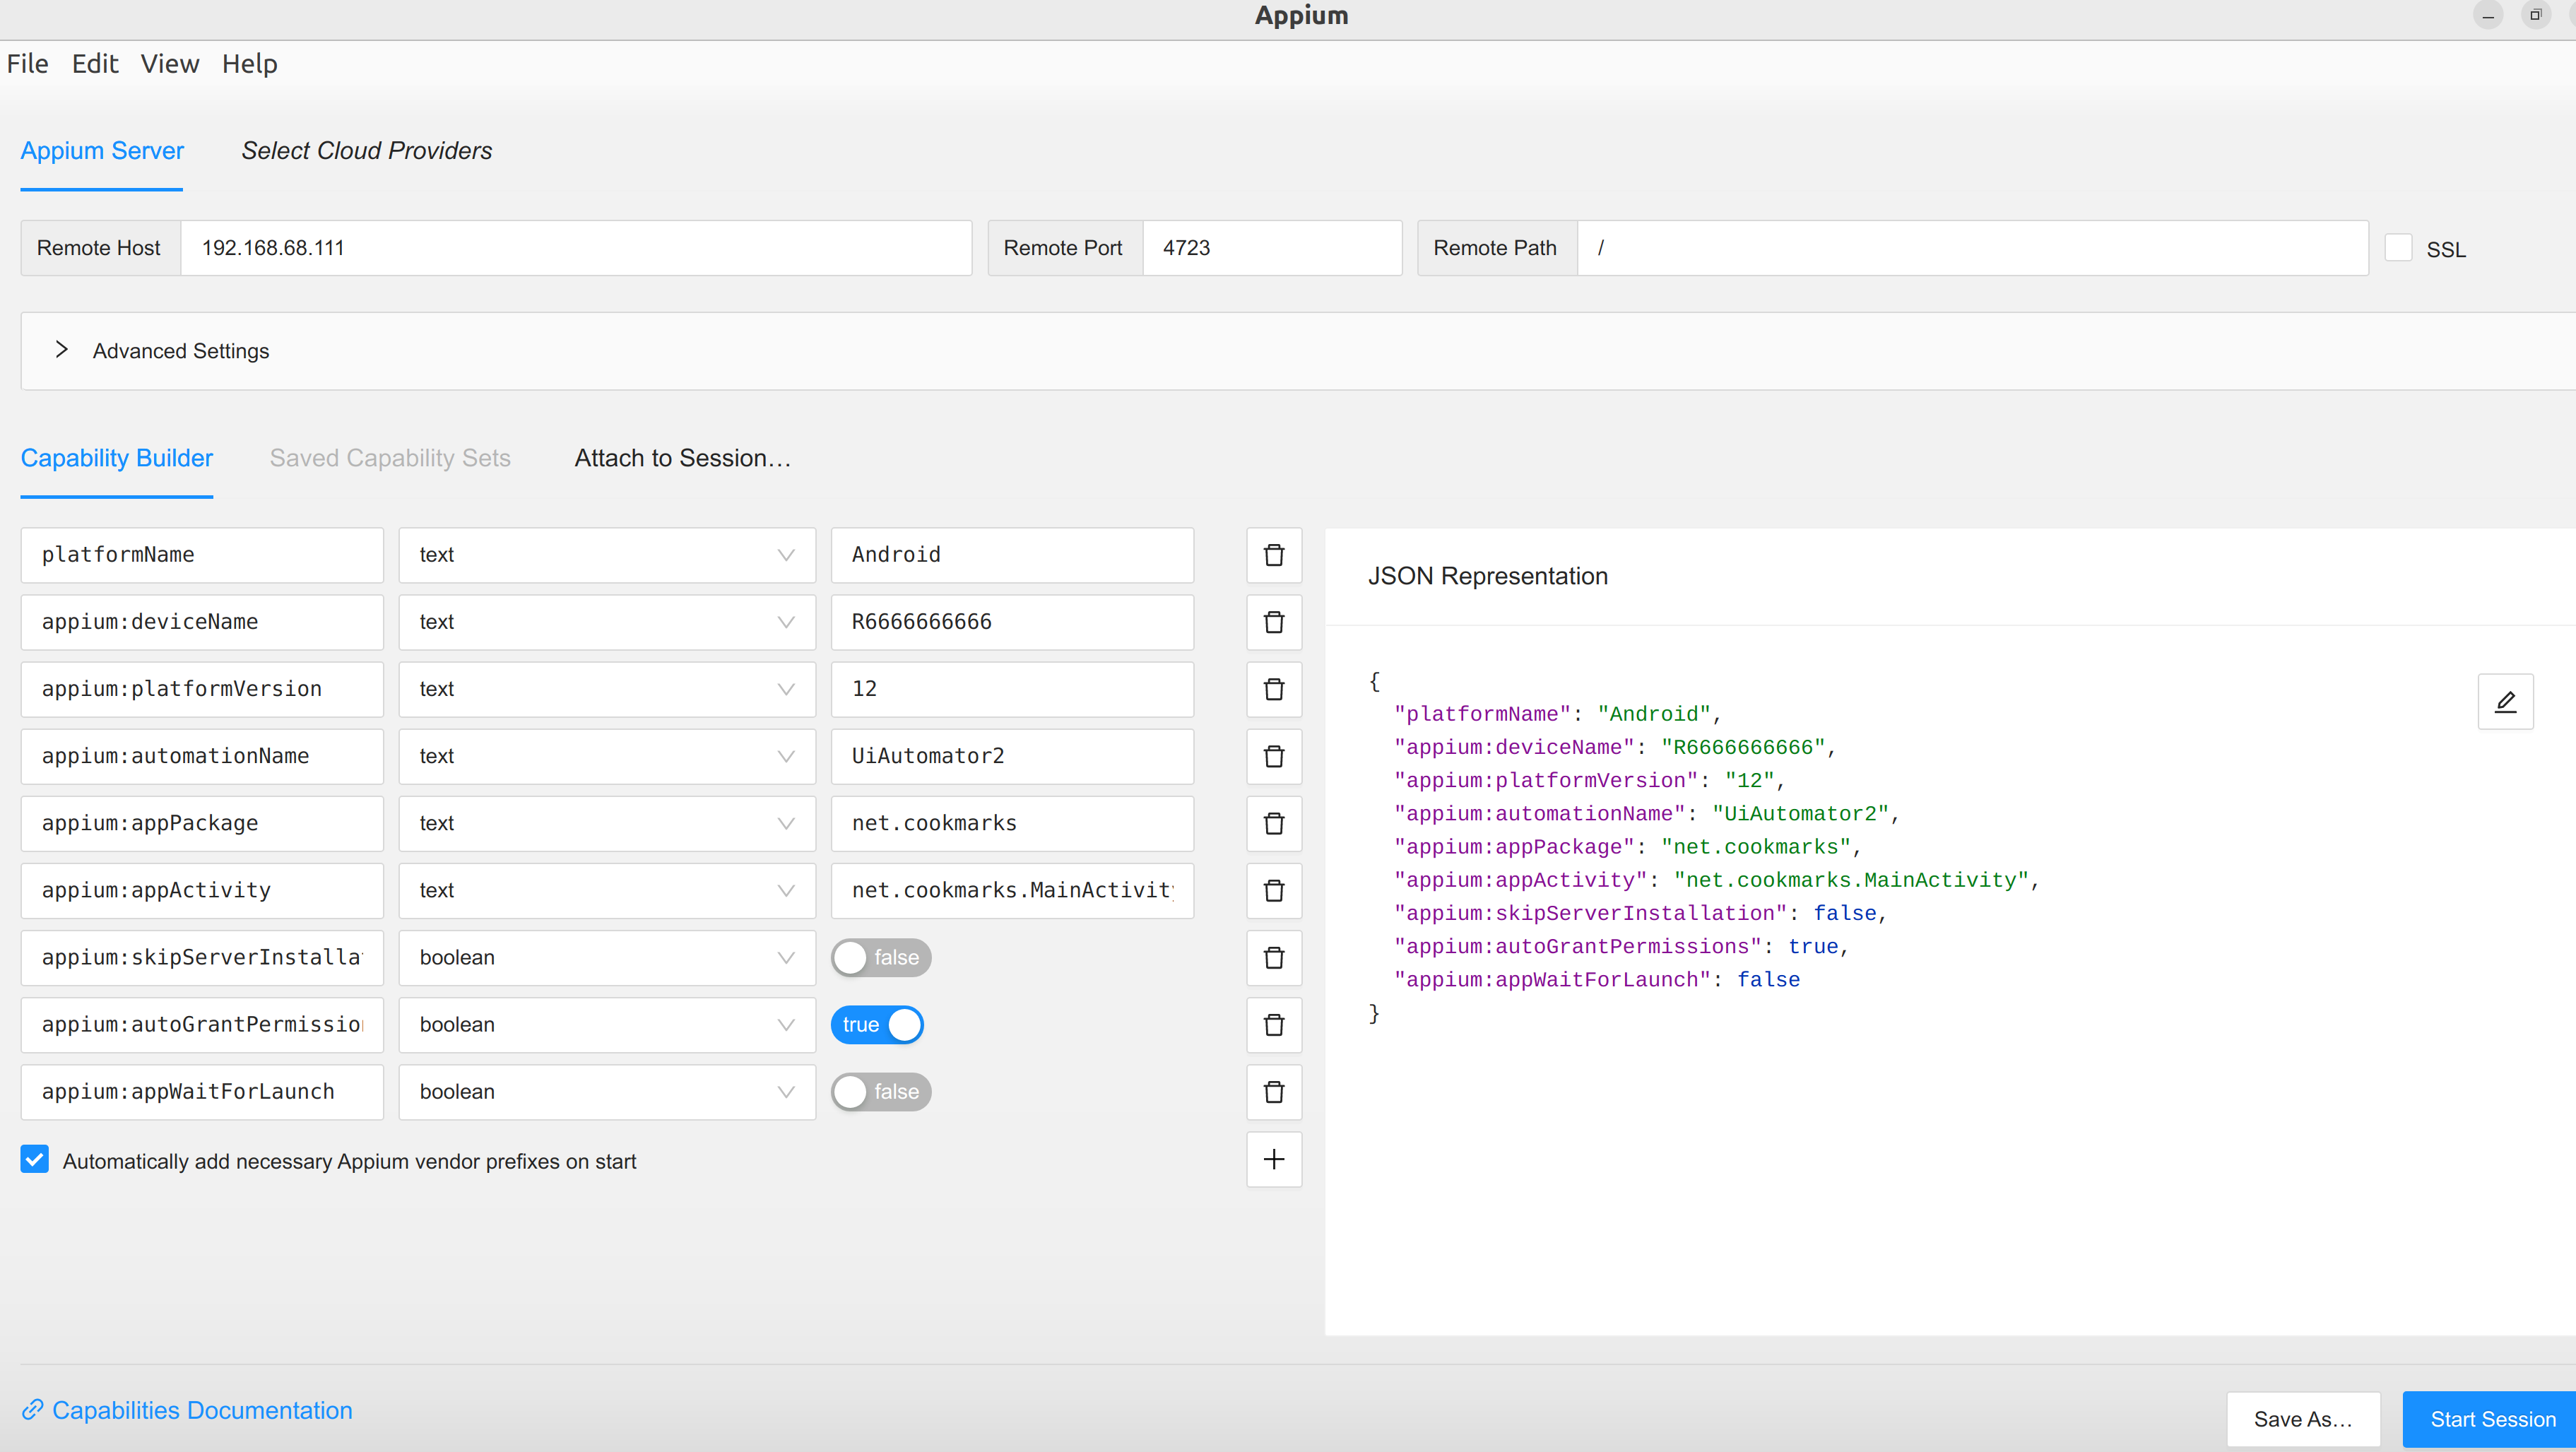
Connect your device and look at what's the device name with adb devices. Now back to the inspector GUI. It should finally look to something like this:

You should fill the remote host with an IP that is accessible from your device. It will not be 192.168.x.x, it might be 10.x.x.x, just check your network settings. 4723 is the port on which appium server is running.
All of the keys are explained in the capabilities list. If I paste the capabilities json, it looks like this:
{
  "platformName": "Android",
  "appium:deviceName": "R6666666666",
  "appium:platformVersion": "12",
  "appium:automationName": "UiAutomator2",
  "appium:appPackage": "net.cookmarks",
  "appium:appActivity": "net.cookmarks.MainActivity",
  "appium:skipServerInstallation": false,
  "appium:autoGrantPermissions": true,
  "appium:appWaitForLaunch": false
}
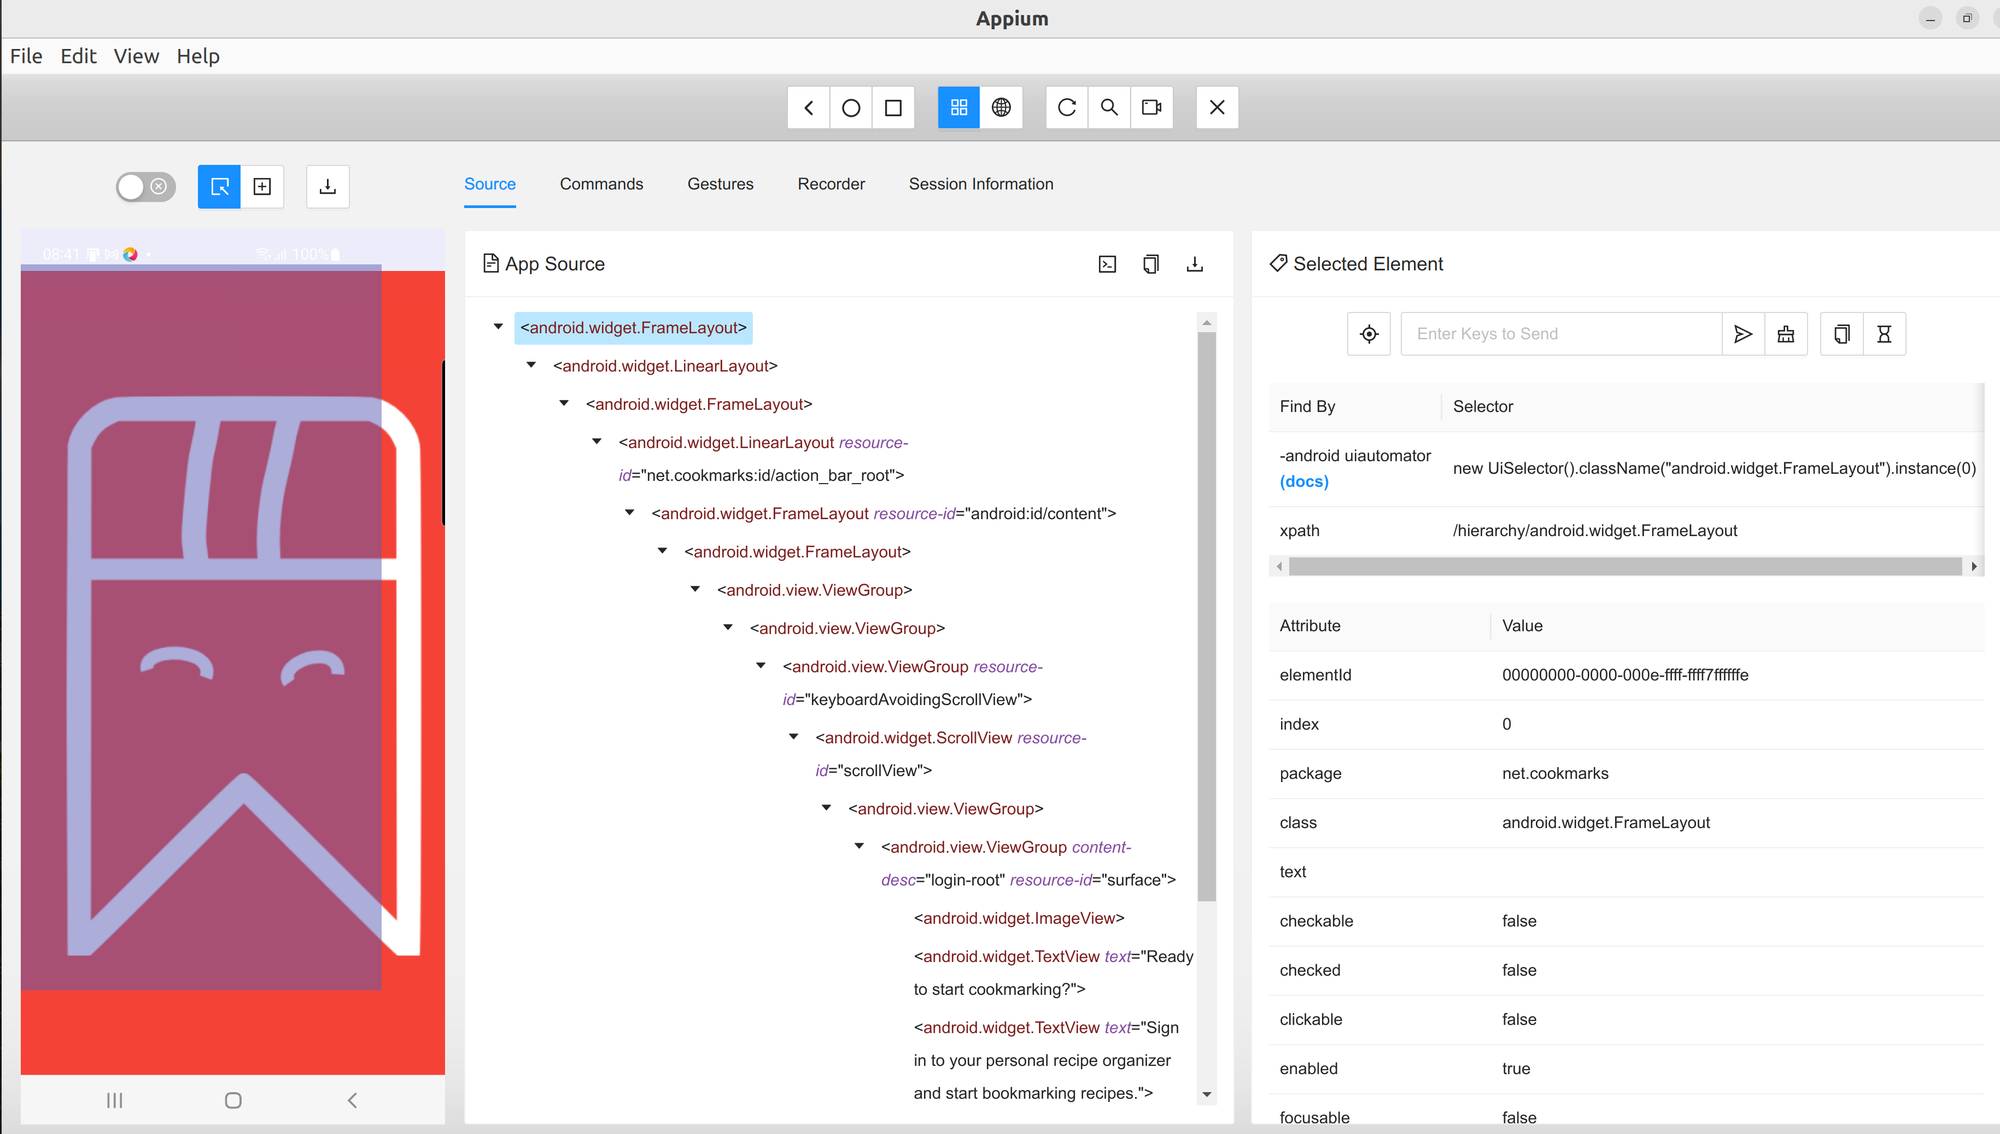
Ideally, you should be able to see something like this in the end:

Problems
Of course, nothing is ideal during development and you might get appium server timeouts.
You might get an Appium Settings app is not running after 5000ms. Same goes with uiautomator2 and test, you might get the Unable to install APK. Try to increase the 20000ms adb execution timeout represented by 'uiautomator2ServerInstallTimeout' capability.
This all means something got corrupted during your appium server run or your device is not allowing the installs. Best way to do it manually
First ensure your device has exactly 3 packages installed:
> adb shell pm list packages -f | grep appium
package:/data/app/~~==/io.appium.settings-==/base.apk=io.appium.settings
package:/data/app/~~==/io.appium.uiautomator2.server-==/base.apk=io.appium.uiautomator2.server
package:/data/app/~~==/io.appium.uiautomator2.server.test-==/base.apk=io.appium.uiautomator2.server.test
If list is incomplete, process got corrupted.
You can uninstall the packages with:
adb uninstall io.appium.settings
adb uninstall io.appium.uiautomator2.server
adb uninstall io.appium.uiautomator2.server.test
Install those packages again, maybe try manually this time.
find ~/.appium -name "*.apk" -exec adb install {} \;Now run adb shell pm list packages -f | grep appium again. If 3 packages are listed, restart appium server and Start session on appium inspector. GUI should be connected to your device.

